
最近因为在做毕设时需要学习一些更新的知识、与使用更复杂的工具,所以我想还是像以往那样,通过记下学习笔记的方式辅助自己学习,所以就开始写这篇笔记。
既然是笔记,那就不用那么多修饰的字词了,简单就好:
前置环境搭建
写在前面:
在一切开始之前,需要先准备好合适的环境:
- 虚拟机:VMware® Workstation 16 Pro(16.2.5 build-20904516)
- 系统:Ubuntu 22.04.2 LTS(此时更推荐使用 Ubuntu 20)
- ⚠️ 注意:请至少为虚拟机分配 50 G 以上的空间,以保证在后续步骤中不会遇到空间不足的问题。
首先,对于一个全新的系统,我们需要安装一个代码编辑器:比如 VS Code 或者 PyCharm,可以在官网或者 Ubuntu 的官方商店下载安装。虽然我两个都安装了,不过因为师兄推荐用后者,所以在下文我就以 PyCharm 为主吧。
Anaconda

Anaconda 是一个开源的 Python 和 R 语言的发行版本,具有管理 Python 的环境和包的工具,提供数据科学和机器学习的开发环境。根据官方的安装教程,我们立刻进行一个安装:
先决条件
# 首先,个人建议先更新软件源列表:
sudo apt update
# 升级已安装的软件包
sudo apt upgrade
sudo apt-get update

# Prerequisites
# To use GUI packages with Linux, you will need to install
# the following extended dependencies for Qt:
# 要在 Linux 中使用 GUI 包,您需要为 Qt 安装以下扩展依赖项:

# Debian
sudo apt-get install libgl1-mesa-glx libegl1-mesa libxrandr2 libxrandr2 libxss1 libxcursor1 libxcomposite1 libasound2 libxi6 libxtst6
安装
对于 x86 系统,也就是我们现在所使用的大多数系统,其安装方式如下:
# 1. In your browser, download the [Anaconda installer for Linux]
#    https://www.anaconda.com/download/#linux/.

-----

# 2. Search for “terminal” in your applications and click to open.

-----

# 3. (Recommended) [Verify the installer’s data integrity with SHA-256].
#    For more information on hash verification, see [cryptographic hash validation].

# In the terminal, run the following:
# shasum -a 256 /PATH/FILENAME
shasum -a 256 ./Downloads/Anaconda3-2023.03-1-Linux-x86_64.sh
# Replace /PATH/FILENAME with your installation's path and filename.

-----

# 4. Install for Python 3.7 or 2.7 in the terminal:
#    For Python 3.7, enter the following:

# Include the bash command regardless of whether or not you are using the Bash shell
# 无论您是否使用 Bash shell,都包括 bash 命令
# bash ~/Downloads/Anaconda3-2020.05-Linux-x86_64.sh
bash ./Downloads/Anaconda3-2023.03-1-Linux-x86_64.sh
# Replace ~/Downloads with your actual path
# Replace the .sh file name with the name of the file you downloaded

-----

# 5. Press Enter to review the license agreement.
#    Then press and hold Enter to scroll.

# 6. Enter “yes” to agree to the license agreement.

-----

# 7. Use Enter to accept the default install location, use CTRL+C to cancel the installation, or enter another file path to specify an alternate installation directory. If you accept the default install location, the installer displays `PREFIX=/home/<USER>/anaconda<2/3>` and continues the installation. It may take a few minutes to complete.
# 7. 使用 Enter 接受默认安装位置,使用 CTRL+C 取消安装,或输入另一个文件路径以指定备用安装目录。如果您接受默认安装位置,安装程序将显示 `PREFIX=/home/<USER>/anaconda<2/3>` 并继续安装。可能需要几分钟才能完成。

# NOTE: Anaconda recommends you accept the default install location. Do not choose the path as `/usr` for the Anaconda/Miniconda installation.
# 注意:Anaconda 建议您接受默认安装位置。不要为 Anaconda/Miniconda 安装选择 `/usr` 路径。

-----

# 8. Anaconda recommends you enter “yes” to initialize Anaconda Distribution by running `conda init`.
# 8. Anaconda 建议您输入“yes”以通过运行 `conda init` 来初始化 Anaconda Distribution。

# 9. The installer finishes and displays, “Thank you for installing Anaconda<2/3>!”

# 10. Close and re-open your terminal window for the installation to take effect, or enter the command `source ~/.bashrc` to refresh the terminal.
# 10. 关闭并重新打开终端窗口以使安装生效,或输入命令 `source ~/.bashrc` 刷新终端。
好的,这样就可以算是将 Anaconda 安装完成了。别急,还有一件事:我们还需要将 ~/anaconda3/bin 环境配置到我们的环境变量文件 PATH 之中,于是
# 获取当前的路径
cd ~/anaconda3/bin
pwd
# 我的环境返回:/home/ubuntu/anaconda3/bin

# 使用编辑器 nano 修改 bashrc 文件
nano ~/.bashrc

# 滑到最下面的位置,输入:
export PATH="/home/ubuntu/anaconda3/bin:$PATH"
然后保存并退出,再刷新命令行,此时我们的 conda 就已经成功地安装到 Linux 系统当中了。
使用
打开终端,在命令行中输入:
anaconda-navigator即可开启 Anaconda 的图形化界面,此时可以打开另一个终端进行操作。或者,也可以不使用 GUI,直接在命令行中使用 conda 命令。在 Anaconda Navigator 界面中,我们通过 GUI 管理环境和安装包,可以创建新的环境、激活/停用环境、安装/卸载包等。由于图形化界面大家都会,所以在下文我们以命令行为主:
此时,我们的系统环境是 base(root),为了防止在这里一通折腾导致我像前几次一样暴毙,我们需要创建一个新的工作环境。在命令行中,使用如下指令创建新环境:
# 创建新的工作环境
conda create --name ns3-gym

# 激活/切换到新的环境
conda activate ns3-gym但是别急,最好不要这样做,因为新的环境里的包会很少,你做到后面不知道少了哪个包,就会很麻烦,所以直接克隆现有的 base(root) 环境为好:
# 先切换到之前的环境
conda activate base

# 删除之前的虚拟环境:
conda env remove --name ns3-gym

# 将本已激活环境的依赖包配置信息到处到应该 YAML 文件:
conda env export > environment.yml
# 这将生成一个名为 environment.yml 的文件,其中包含当前环境的依赖包列表。

# 然后创建一个新的环境,并从导出的 YAML 文件中导入依赖包:
conda env create -f environment.yml --name ns3-gym
在等待一段时间后,我们就可以在新环境中使用与原始环境相同的依赖包和配置了。不过需要注意的是,克隆环境是一个逐字复制环境的过程,包括所有依赖包和配置信息。这可能会占用一定的时间和磁盘空间,具体取决于环境的大小和复杂度。
最后,我们切换到新的环境中:
conda activate ns3-gym好啦,到这里我们就已经切换到工作环境啦,到时候一个不小心把它搞坏了也不怕。不过,我强烈建议像我这样的萌新,在这里为虚拟机存一个快照(
ns-3
ns-3 is a discrete-event network simulator for Internet systems, targeted primarily for research and educational use. ns-3 is free, open-source software, licensed under the GNU GPLv2 license, and maintained by a worldwide community.
官方教程:https://www.nsnam.org/docs/tutorial/html/
ns-3 is a discrete-event simulator typically run from the command line. It is written directly in C++, not in a high-level modeling language; simulation events are simply C++ function calls, organized by a scheduler.
简单来说,ns-3 是一个网络协议的研究与仿真工具。
安装
先决条件
根据官方的教程,首先要检查 / 安装相关的第三方依赖软件包。下面的命令都是使用的 apt 工具管理,这些都是官方文档给出的;不过,由于我们使用了 conda 环境,所以最好能使用 conda install 命令安装;如果 conda 中没有,再使用也不迟。因为如果使用了 sudo apt install 指令,那就是在全局安装包了,与我们环境隔离的打算相去甚远。
# 个人建议还是先更新软件源列表:
sudo apt update
# 升级已安装的软件包
sudo apt-get upgrade
sudo apt-get update

# 检查 git
sudo apt install git
git --version

# 检查 tar
tar --version

# 检查 python3
python3 -V

# 安装 cmake
sudo apt install cmake
cmake --version

# 安装 g++
sudo apt install g++
g++ --version
报错·I
此时我遇到一个问题,报错信息为:
$ sudo apt install g++

Reading package lists... Done
Building dependency tree... Done
Reading state information... Done
Some packages could not be installed. This may mean that you have
requested an impossible situation or if you are using the unstable
distribution that some required packages have not yet been created
or been moved out of Incoming.
The following information may help to resolve the situation:

The following packages have unmet dependencies:
 libc6-dev : Depends: libc6 (= 2.35-0ubuntu3) but 2.35-0ubuntu3.1 is to be installed
E: Unable to correct problems, you have held broken packages.
Ubuntu 无法安装 g++,这个问题困扰了我很长时间,我在 stackoverflow 上找到了这样的解决方法:这个错误提示是因为 libc6-dev 这个软件包依赖的 libc6 软件包版本不一致。具体来说,当前系统中安装的 libc6 版本是 2.35-0ubuntu3.1,而 libc6-dev 要求的版本是 2.35-0ubuntu3。所以需要手动安装更低版本的指定软件包:
sudo apt install libc6=2.35-0ubuntu3然后就可以继续愉快地使用 Ubuntu 啦!
下载源码
mkdir ns-3
cd ns-3

mkdir workspace
cd workspace

# 下载
wget https://www.nsnam.org/release/ns-allinone-3.29.tar.bz2

# 解压
tar xjf ns-allinone-3.29.tar.bz2
cd ns-allinone-3.29/
构建
我们会使用 build.py 进行 ns-3 的构建:
# 在构建前先查看指令
./build.py --help
报错·II
此时又报错:
/usr/bin/env: ‘python’: No such file or directory在查询我的好朋友 stackoverflow 后,我了解到:
Since running the script explicitly with
python3worked OK, it sounds like you’re on a distro where by default you only havepython3and nopython. As other answers suggest, you may installpython-is-python3(which basically creates apythonsymlink pointing topython3)
于是我按照好心人的指导,安装了 python-is-python3,命令如下:
sudo apt-get install python-is-python3好了,现在我们又可以愉快地下一步了(救救孩子吧,我真不想再配环境了
# 编译与安装
./build.py --enable-examples --enable-tests然后就是漫长的等待。如果中途因故暂停或中断了编译进程,只需要在下次重新输入相同的命令即可。在重新开始编译时,编译器会自动跳过已编译的文件,并显示:
Consolidate compiler generated dependencies of target xxx在这之后当然仍旧是漫长地等待。在编译完成后,会显示:
...
[2616/2618] Compiling src/tap-bridge/model/tap-encode-decode.cc
[2617/2618] Compiling src/tap-bridge/model/tap-creator.cc
[2618/2618] Linking build/src/tap-bridge/ns3.29-tap-creator-debug
Waf: Leaving directory `/home/ubuntu/ns-3/workspace/ns-allinone-3.29/ns-3.29/build'
Build commands will be stored in build/compile_commands.json
'build' finished successfully (6m35.643s)
⚠️记住,一定要为 Linux 分配足够的磁盘空间,否则会编译失败。
测试
同样的,使用 test.py 进行测试:
# 测试
cd ns-3.29

# 官方给的指令是下面这个:
./test.py --no-build

# 上面那个是官方最新的 ns-3.38 的指令,
# 不过在 ns-3.29 的版本中,test.py 后面不支持这个参数,使用直接 test 就好
./test.py
如果没有问题,继续保持耐心等待,会显示如下内容云云:
PASS: TestSuite config
PASS: TestSuite attributes
PASS: TestSuite object
...
614 of 624 tests passed (614 passed, 10 skipped, 0 failed, 0 crashed, 0 valgrind errors)
List of SKIPped tests:
    examples/routing/simple-routing-ping6.py
    examples/tutorial/first.py
    examples/wireless/mixed-wired-wireless.py
    examples/wireless/wifi-ap.py
    ns3-tcp-cwnd
    ns3-tcp-interoperability
    nsc-tcp-loss
    src/bridge/examples/csma-bridge.py
    src/core/examples/sample-simulator.py
    src/flow-monitor/examples/wifi-olsr-flowmon.py
跳过了 10 个文件,应该也不会有问题吧……
Hello World
在万事俱备后,我们照例跑一下实例程序:
./ns3 run hello-simulator

# 输出
Hello Simulator
官方描述得很好,但在 ns-3.29 里不是这样的,得使用在高级版本中已经被淘汰的 waf 才行:
./waf --run hello-simulator

# 输出:
Waf: Entering directory `/home/ubuntu/ns-3/workspace/ns-allinone-3.29/ns-3.29/build'
Waf: Leaving directory `/home/ubuntu/ns-3/workspace/ns-allinone-3.29/ns-3.29/build'
Build commands will be stored in build/compile_commands.json
'build' finished successfully (7.094s)
Hello Simulator
就此,我们的安装步骤就完全结束了。很喜欢 ns-3 官网的一句话:
Congratulations! You are now an ns-3 user!
ns3-gym

GitHub 处:https://github.com/openai/gym/
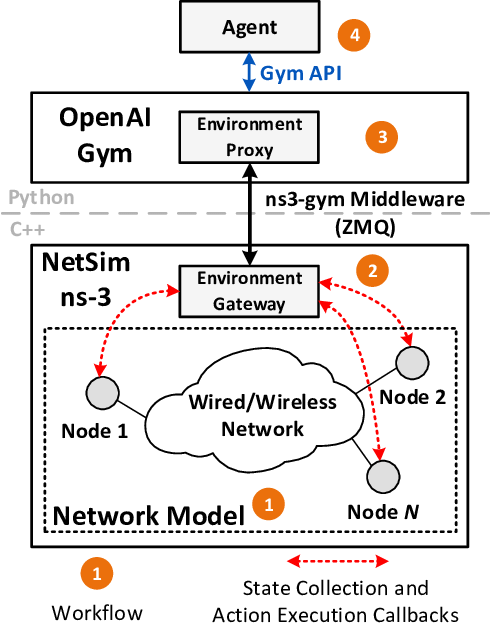
OpenAI Gym is a toolkit for reinforcement learning (RL) widely used in research. The network simulator ns–3 is the de-facto standard for academic and industry studies in the areas of networking protocols and communication technologies. ns3-gym is a framework that integrates both OpenAI Gym and ns-3 in order to encourage usage of RL in networking research.
简单来说,这是一个强化学习工具包,也是我研究路由协议的必备工具,它的框架结构如下图:
安装
根据官方的安装教程:
# 首先 cd 到自己的安装环境中,在本机上的环境是:
cd ns-3/workspace/ns-allinone-3.29/ns-3.29

-----

# 1. Install all required dependencies required by ns-3.
# 1. 安装 ns-3 所需的所有依赖项。
# Check ns-3 requirements
# 检查 ns-3 要求

# minimal requirements for C++:
apt-get install gcc g++ python

# 注:记得加上sudo 以 root,下同。
# 注:另外,python 包现在应该是 python3 了。

-----

# 2. Install ZMQ and Protocol Buffers libs:
# 2. 安装 ZMQ 和 Protocol Buffers 库:

# sudo apt-get update 若已执行,则此处可不再执行
apt-get install libzmq5 libzmq3-dev
apt-get install libprotobuf-dev
apt-get install protobuf-compiler

-----

# 3. Clone ns3-gym repository in to contrib directory and change the branch:
# 3. 将 ns3-gym 存储库克隆到 contrib 目录并更改分支:

cd ./contrib
git clone https://github.com/tkn-tub/ns3-gym.git ./opengym
cd opengym/
git checkout app

# It is important to use the `opengym` as the name of the ns3-gym app directory.
# 使用 `opengym` 作为 ns3-gym 应用程序目录的名称很重要。

-----

# 4. Configure and build ns-3 project (if you are going to use Python virtual environment,
#    please execute these commands inside it):
# 4. 配置并构建 ns-3 项目(如果你打算使用 Python 虚拟环境,请在其中执行这些命令):

# 注:此时应该先回到 ./ns-3.29 目录
# cd ../..
./waf configure --enable-examples
./waf build

# Note: Opengym Protocol Buffer messages (C++ and Python) are build during configure.
# 注意:Opengym 协议缓冲区消息(C++ 和 Python)是在配置期间构建的。
然后再次开始编译,输出:
...
[2339/2340] Compiling src/tap-bridge/model/tap-creator.cc
[2340/2340] Linking build/src/tap-bridge/ns3.29-tap-creator-debug
Waf: Leaving directory `/home/ubuntu/ns-3/workspace/ns-allinone-3.29/ns-3.29/build'
Build commands will be stored in build/compile_commands.json
'build' finished successfully (5m3.762s)

Modules built:
antenna                   aodv                      applications
bridge                    buildings                 config-store
core                      csma                      csma-layout
dsdv                      dsr                       energy
fd-net-device             flow-monitor              internet
internet-apps             lr-wpan                   lte
mesh                      mobility                  mpi
netanim (no Python)       network                   nix-vector-routing
olsr                      opengym (no Python)       point-to-point
point-to-point-layout     propagation               sixlowpan
spectrum                  stats                     tap-bridge
test (no Python)          topology-read             traffic-control
uan                       virtual-net-device        wave
wifi                      wimax

Modules not built (see ns-3 tutorial for explanation):
brite                     click                     openflow
visualizer
报错·III
没有问题,我们继续进行后面的步骤:
# 注:在下一步之前,请事先安装 pip3,
# 如果你像我一样没有安装 pip3,则需要先执行安装命令
sudo apt install python3-pip
这里又遇到一个包版本错误:
The following information may help to resolve the situation:

The following packages have unmet dependencies:
 python3-distutils : Depends: python3-lib2to3 (= 3.10.4-0ubuntu1) but 3.10.6-1~22.04 is to be installed
E: Unable to correct problems, you have held broken packages.
没关系,参照上文的解决方式,我们安装对应的包即可:
sudo apt install python3-lib2to3=3.10.4-0ubuntu1在安装好 pip3 后,我们继续进行第 5 步骤:
# 5. Install ns3gym located in model/ns3gym (Python3 required)
# 5. 安装位于 model/ns3gym 的 ns3gym(需要 Python3)

cd ./contrib/opengym/
pip3 install --user ./model/ns3gym
看命令行的反馈,好像还帮我们初始化好了,不过还是有一个路径警告:
...
Installing collected packages: gym-notices, pyzmq, numpy, cloudpickle, gym, ns3gym
  WARNING: The scripts f2py, f2py3 and f2py3.10 are installed in '/home/ubuntu/.local/bin' which is not on PATH.
  Consider adding this directory to PATH or, if you prefer to suppress this warning, use --no-warn-script-location.
Successfully installed cloudpickle-2.2.1 gym-0.26.2 gym-notices-0.0.8 ns3gym-0.1.0 numpy-1.24.3 pyzmq-25.0.2
这个警告提示 f2py 等脚本被安装在 /home/ubuntu/.local/bin 目录下,但该目录不在系统的环境变量 PATH 中。因此,如果想要在终端中运行这些脚本,则需要手动添加该目录到 PATH 中,或者将这些脚本复制到在 PATH 中的 /usr/local/bin 目录中。
针对后者,输入以下命令即可复制到目录中:
sudo cp /home/ubuntu/.local/bin/f2py /usr/local/bin
sudo cp /home/ubuntu/.local/bin/f2py3 /usr/local/bin
sudo cp /home/ubuntu/.local/bin/f2py3.10 /usr/local/bin
后面的安装步骤就比较简单了:
# 6. (Optional) Install all libraries required by your agent (like tensorflow, keras, etc.).
# 6. (可选)安装代理所需的所有库(如 tensorflow、keras 等)。

-----

# 7. Run example:

cd ./contrib/opengym/examples/opengym/
./simple_test.py
测试结果输出:
Got new port for ns3gm interface:  6927
Observation space:  Box(0, 10, (5,), uint64) uint64
Action space:  Discrete(5) int64
Step:  0
---obs:  [4, 9, 5, 3, 9]
---action:  1
Step:  1
---obs, reward, done, info:  [7, 4, 0, 3, 8] 2.0 False testInfo|123
---action:  4
Step:  2
---obs, reward, done, info:  [6, 9, 9, 5, 6] 3.0 False testInfo|123
---action:  2
Step:  3
---obs, reward, done, info:  [5, 8, 6, 9, 3] 4.0 False testInfo|123
---action:  3
Step:  4
---obs, reward, done, info:  [8, 4, 6, 10, 5] 5.0 False testInfo|123
---action:  0
Step:  5
---obs, reward, done, info:  [10, 6, 8, 1, 1] 6.0 False testInfo|123
---action:  0
Step:  6
---obs, reward, done, info:  [10, 3, 10, 4, 7] 7.0 False testInfo|123
---action:  1
Step:  7
---obs, reward, done, info:  [4, 8, 4, 8, 9] 8.0 False testInfo|123
---action:  0
Step:  8
---obs, reward, done, info:  [10, 10, 5, 0, 4] 9.0 False testInfo|123
---action:  2
Step:  9
---obs, reward, done, info:  [2, 2, 0, 9, 1] 10.0 False testInfo|123
---action:  4
Step:  10
---obs, reward, done, info:  [5, 5, 4, 9, 1] 11.0 True testInfo|123
Done
没有问题,那么下一步呢?
# 8. (Optional) Start ns-3 simulation script and Gym agent separately
#    in two terminals (useful for debugging):
# 8. (可选)在两个终端分别启动ns-3模拟脚本和Gym agent(对调试有用):

# Terminal 1
# 我需要:cd ns-3/workspace/ns-allinone-3.29/ns-3.29
./waf --run "opengym"

# Terminal 2
cd ./contrib/opengym/examples/opengym/
./test.py --start=0
运行一点问题也没有!恭喜,现在重要的环境配置均已结束,下面就可以真正开始做我的仿真了。
其他遇到的问题
作为一个 Linux 萌新,我在这个过程中,遇到了许多的问题。
安装方式出现问题
按照官方的教程,通过 Git 方式下载 ns-3:
$ mkdir ns-3
$ cd ns-3

$ mkdir workspace
$ cd workspace

$ git clone https://gitlab.com/nsnam/ns-3-allinone.git
$ cd ns-3-allinone

$ python3 download.py
# 然后会下载大概 200M 左右的文件
# 包括 ns-3,NetAnim 和 bake
在通过 Git 下载完 ns-3 后,发现官方并没有针对这种情况给出构建方式,称:
Note: This build step is only available from a source archive release described above; not from downloading via git or bake.
试图直接运行构建文件会报错:
$ ./build.py --enable-examples --enable-tests
# Build NetAnim
Entering directory `netanim'
 =>  qmake -v
Could not find qmake in the default path
 =>  qmake-qt5 -v
Could not find qmake-qt5 in the default path
 =>  qmake-qt4 -v
Could not find qmake-qt4 in the default path
 =>  qmake NetAnim.pro
Error building NetAnim. Ensure the path to qmake is correct.
Could not find qmake or qmake-qt5 in the default PATH.
Use ./build.py --qmake-path <Path-to-qmake>, if qmake is installed in a non-standard location
Note: Some systems use qmake-qt5 instead of qmake
Skipping NetAnim ....
Leaving directory `netanim'
# Building examples (by user request)
# Building tests (by user request)
# Build NS-3
Entering directory `/home/clover/ns-3/workspace/ns-3-allinone/./ns-3-dev'
 =>  /usr/bin/python3 ns3 configure --enable-examples --enable-tests
Traceback (most recent call last):
  File "/home/clover/ns-3/workspace/ns-3-allinone/ns-3-dev/ns3", line 1615, in <module>
    main()
  File "/home/clover/ns-3/workspace/ns-3-allinone/ns-3-dev/ns3", line 1508, in main
    current_cmake_cache_folder, current_cmake_generator = search_cmake_cache(build_profile)
  File "/home/clover/ns-3/workspace/ns-3-allinone/ns-3-dev/ns3", line 561, in search_cmake_cache
    raise Exception("No generator available.")
Exception: No generator available.
Traceback (most recent call last):
  File "/home/clover/ns-3/workspace/ns-3-allinone/./build.py", line 155, in <module>
    sys.exit(main(sys.argv))
  File "/home/clover/ns-3/workspace/ns-3-allinone/./build.py", line 146, in main
    build_ns3(config, build_examples, build_tests, args, build_options)
  File "/home/clover/ns-3/workspace/ns-3-allinone/./build.py", line 65, in build_ns3
    run_command(cmd) # ns3 configure ...
  File "/home/clover/ns-3/workspace/ns-3-allinone/util.py", line 25, in run_command
    raise CommandError("Command %r exited with code %i" % (argv, retval))
util.CommandError: Command ['/usr/bin/python3', 'ns3', 'configure', '--enable-examples', '--enable-tests'] exited with code 1
介于我十分小白,大概能理解到这样直接的方式不容易,可我又不愿意使用 CMake,于是就回档重新开始了。
虚拟机注意事项
在创建 VMWare 虚拟机时,因为常听说 Linux 非常节省资源,所以就只分配了 20G 的磁盘空间。结果编译到一半中断了,系统提示我磁盘空间不足,这时我才知道才刚构建 50% 就已经快要把磁盘空间用完了……
另外,一定要为虚拟机分配足够的 CPU 核心,不要像我傻乎乎地只分配了两个小核,然后傻乎乎地等了半天……
所以说,Linux 节约资源根本就是误解,主要是取决于我们要拿它做什么。
另外,相比于分配 16 个处理器、每个处理器一个核心,为 Ubuntu 分配 8 个处理器、每个处理器两个核心更好。根据 Ubuntu 官方的表述,建议减少处理器的数量,因为操作系统或应用程序对多个处理器的利用可能不够高效。
版本注意事项
从一开始,我的师兄就推荐我用 ns-3.29 版本。不过我年少轻狂,看到官方更推荐新版本,并且官网也只有新版本的安装教程,所以我就被忽悠着安装了 ns-3.38,这让我后来吃足了苦头。
由于我需要安装 ns3-gym,而这个工具一开始就是基于 ns-3.29 构建的。虽然官方提供了高级版本的安装方式,但我这里总是不明不白地报错。比如:
我的 ns3 项目文件夹下没有 waf 文件,这令我有些困惑。在网上查询资料后,发现 ns3 在 3.36 版本就取消了 waf.py 编译器,使用了 ns3.py 替代。而这一步的编译,用的是 CMake。
即使我不断地将错误一一解决,但最终碰到了一个我无法解决、无法查到的问题,我放弃了。
真是血泪教训啊。
Ubuntu 系统问题
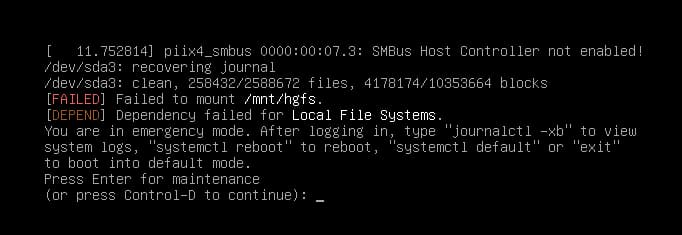
现在我算是理解为什么基本没人将 Linux 作为日常使用的系统了,这破玩意儿三天两头出问题,一出问题就要重装,而且每次出的问题还不一样!我这一周已经重装了三次系统了!我受不了了,天知道我用 sudo 的时候干掉了什么东西……
有了快照后,我们遇到问题就可以回滚,而不是重装系统了。
后记
现在看来,好庆幸当时一边做一边写了笔记:有时环境报错,我需要检查之前的配置;有时某几步需要重新做,我也不用再像第一次一样翻那么多的标签页,就简简单单地回看笔记就好。并且笔记中也记下了当时遇到了问题,使我也能够帮助到有需要的同学,真是太棒了!
其他参考资料:
- 首先感谢各官方网站上详尽的文档。
- Anaconda安装【Linux系统】,小L-Daily,Bilibili。
- ns-3 网络模拟中文入门视频教程系列,开源文摘,Bilibili。
- ns-3 快速上手,Pinvon’s Blog。
- 感谢 stackoverflow 上的世界友人们给予我的大力支持(
- 感谢我实验室的好兄弟 Monkey L 和 Boss G 给我的许多帮助
- 最后,感谢 OpenAI 公司开发的 ChatGPT 为我的 Linux 实践释惑
我真是太感动了,在最后我跟 ChatGPT 说:「好的,多谢!」,它回答我说:「不客气!如果你还有其他问题,随时都可以问我。祝你配置和构建顺利,顺利使用 ns-3 和 openai-gym!」